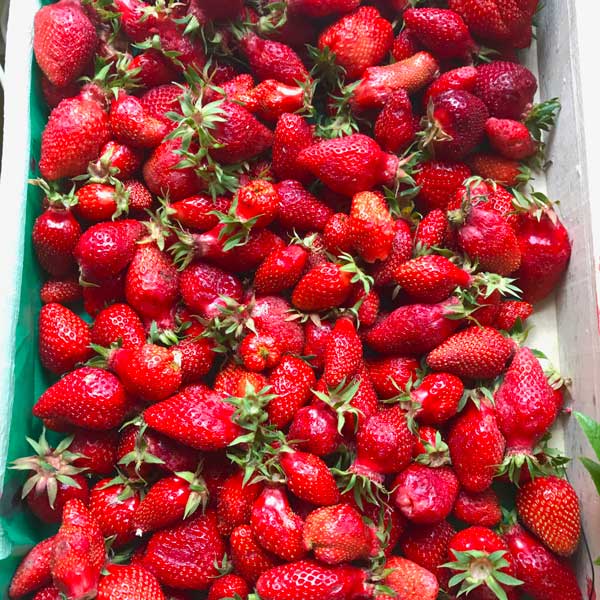
I have a little problem with large quantities of fruit for sale. I see them, and I must have them—for jam, natch. Nevermind that a 5-pound flat of strawberries will make three times the amount of jam I consume in a year…and I’m on my fourth flat of 2017. Or that an 11-pound bag of rhubarb will require not one, but TWO large pots to cook it down, as I discovered last week. Or that there’s simply no more room on any of my shelves anywhere for any more jam. (I have put cases of jam in the attic before.)
Jam-making is a kitchen project that grabs me by the gut, and there’s just no resisting. I find too much to love about the task—like how it lets you take something highly perishable (seasonal fruit) and turn it into something that will keep for months, even years in a cupboard. Like how every step of the process is a sensory experience, from watching the foam dissipate from the surface of the simmering fruit, to feeling the mixture thicken as you draw a spatula through…even to singeing your fingers and forearms with errant drips (220˚F is HOT).
There’s also what I think of as the Fickle Factor. Take the two aforementioned batches of rhubarb jam. Cooked on the same day, at the same time, using the same ingredients…and one ended up thicker and sweeter than the other. Who knows why. A bigger pot? A higher BTU burner? And last fall, a pumpkin butter recipe that I’ve been making for a ga-zillion years decided it wouldn’t set at all and ended up as a weird, bright orange (but still pretty tasty) pumpkin coulis. Then again, an apricot jam that should never have turned out because I was so careless with the preparation may just be the best batch I’ve ever made. Go figure. It is that very fickleness that makes jam-making success so sublime. When it works, it is as though all the stars and planets have aligned to give you something so incomparably lovely and sweet that you want to share it with everyone you know. (Hence my penchant for large quantities of fruit and big batches of jam.)
Happily, you don’t need a jam obsession like mine to reap all the rewards of making a batch. Two pounds of fruit will do, along with some sugar, a lemon, and a few empty jars. If you have an instant-read thermometer, great (I love mine), but if not, there are other, ready-to-hand ways of seeing if a jam has set. And remember: There is no such thing as a bad batch of homemade jam. Thin or thick, slightly sour or a tad too sweet, homemade jam will always be better than anything you can buy in the store.
Making jam is as easy as boiling water, but there are lots of little details that go along with the process. I’ve tried to streamline the instructions here as much as possible and give explanations at the end so that you get the gist without getting overwhelmed by information. To delve into the subject further, Canning 101 on the Food In Jars website is a goldmine.
This basic jam recipe is the one I come back to again and again. Fancy flavors and techniques are great and all, but there’s just no rivaling the taste of peak season fruit in its pure, unadulterated form.
2 lb. (900 g.) prepared fresh fruit
1 ½ to 2 lb. (3 to 4 cups) white sugar
1 organic lemon
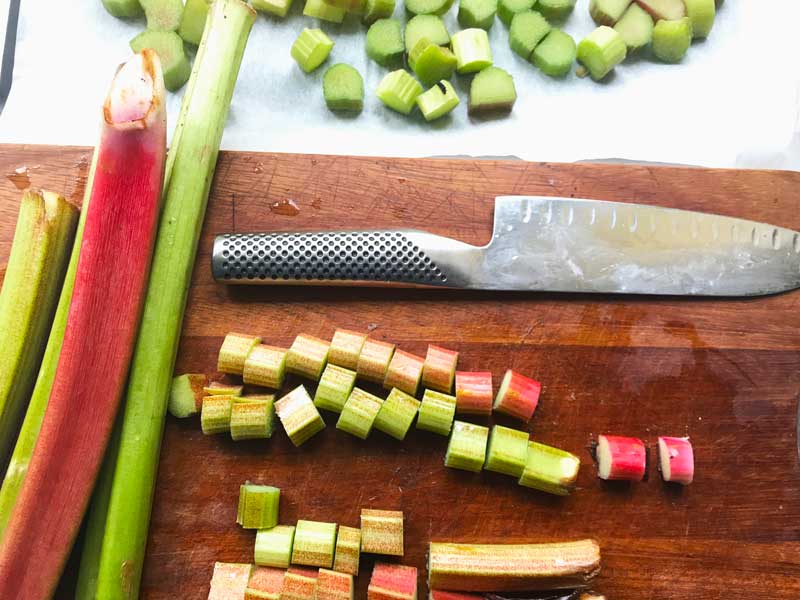
Peel, seed, and pit enough fruit to have 2 full pounds of prepared fruit. (1)
Place the fruit in a large stainless steel or enameled pot or saucepan, and add the sugar (2).
Squeeze the lemon juice into the fruit mixture, add the lemon halves to it, and stir until combined. (3)
Let the jam mixture sit at room temperature anywhere from 30 minutes to 24 hours to let the sugar draw out some of the fruit’s natural juices and dissolve. Prepare your jars during this time. For two pounds of fruit, you’ll need 3 to 4 8-oz. wide-mouth jars with clean, metal, tight-fitting lid. (4)
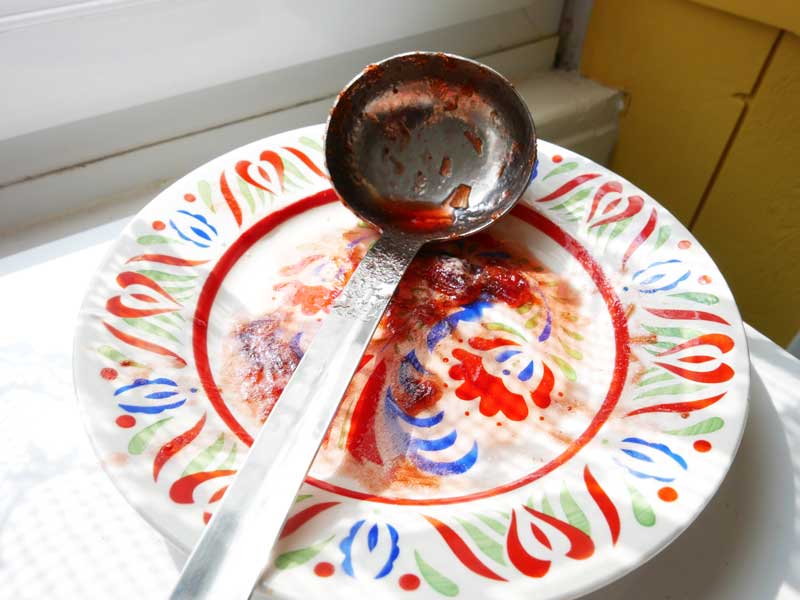
Stir the jam mixture well to make sure there are no sugar clumps at the bottom of the pot, then bring it to a boil over medium heat, stirring occasionally to keep it from boiling over. Keep the jam at a lively simmer until it is set. (5) The two best ways to test if a jam is set are with an instant-read thermometer or a very cold (as in, chilled in the freezer) plate or saucer. When jam reaches 220˚F (104-105˚C) on an instant-read thermometer, you’re pretty much good to go. Or, when a little jam spooned onto a small, cold plate turns thick and jammy after it cools and the surface of that dollop wrinkles when pushed, then it’s time to ladle it into jars.
Take the jam off the stove and ladle it into jars, leaving about 1/8-inch head room. Carefully wipe the edges of the jar openings (6), then close the lids tightly. Turn each jam jar upside down to cool. (7) Jars of jam that are not completely filled will need to be stored in the fridge. Makes 3 to 4 jars
(1) Good jam requires a little bit of math to get the fruit-to-sugar ratio right, so the measuring starts with the weight of prepared fruit. Cup amounts will vary from fruit to fruit.
(2)Most jam recipes call for a 1:1 ratio of fruit to sugar. I usually use a 75 % ratio, or 1 ½ pounds of sugar to every 2 pounds of fruit, unless the fruit is not very sweet, in which case, I adjust accordingly. I don’t recommend going below 75 % because the sugar is also acting as the preservative for the fruit. Lower sugar content can make your jam less shelf stable, and nobody wants to open a jar of jam that’s gone furry with mold or rancid with age.
(3) The lemon half trick is something I learned at a jam-making demo by Francis Miot, a master jam maker in France. He explained that the natural pectins in the lemon peel helped the jam set. I can’t really tell much of a difference myself (in other words, the lemon half addition is not an essential step if, say, you can’t find organic or untreated lemons), but I’ve found the lemon halves useful in determining when a jam is ready to go into jars. (See below.)
(4) I don’t sterilize my jars and I’ve never had a problem, but all you have to do is google “sterilize jars” and you will have as many explanations and methods for doing so as you will ever need. I am a clumsy ladle-er, so I prefer wide-mouth jars that keep drips to a minimum.
(5) But how do you tell when a jam is set? Blackberry and raspberry jams, which are high in pectin, set in 5 to 10 minutes. Apple butter can take anywhere from 6 to 8 HOURS. This is where your senses—and/or an instant-read thermometer—come into play. The visual cue that the jam is starting to jell is that the white foam that appeared at the start of the boil will disappear. Then the bubbles on top of the boiling jam will get bigger. You’ll start to feel the jam getting thicker when you stir it. Finally, take a look at those lemon halves. When the pulp in the center starts to glisten and look candied, then the jam is nearly ready. If you use an instant-read thermometer, place it in the simmering jam at the start, set it to go off at 220˚F (104-105˚C), then go about your business in the kitchen, stirring occasionally. Once it comes to temperature, stir it well, let it come to temperature again, test it with the cold saucer test as well (if you’re a worrier like me), then ladle it into jars.
(6) Wipe the jars down carefully—any stray drips or globs will be exposed to the air and can turn moldy.
(7) Full disclosure: The upside-down jar sealing technique has been contested and is not recommended by food safety professionals, who call for a boiling water bath. (Google it.) But I believe that boiling-water bath is the biggest hurdle to regular jam-making. Every French jam maker I know uses the upside-down method because it’s quick, easy and really, really reliable for jams and other high-acid preserves. If for some reason, the seal doesn’t take and the jam gets moldy, mucky, and/or funky tasting, my advice is to show a little common sense and JUST DON’T EAT IT.

Worked beautifully with the strawberry rhubarb!
merci pour cette explication; ça pourrait m’aider à bien préparer.
Great article, just what I was looking for Just open & start fruit.
Fantastic post, very informative. I’m wondering why the other experts of this sector don’t notice this.
You must continue your writing. I’m confident, you’ve
a great readers’ base already!
This was very helpful! you mind going into more detail about the half lemon trich?
You add a half a (squeezed, seeded) lemon to the jam while it’s boiling. The pectin from the skin then goes into the jam, and when the jam is ready, you will see that the inside of the lemon (pulp) looks all cooked and jammy itself.
BRAVO!!!
I AM ALSO A JAM FREAK! Well, maybe not quite as bad as you. That is, not yet! I just happen to be on my way home right now with mangoes and cherries. Going to attempt to combine them to make myself a Mango Cherry Delight. My biggest dread and the only dread that I have when making Jam is the boil bath! Although it provides a nice facial, it really is a pain in the rear. I can’t wait to try your style
The upside-down jar method works well! Everyone in France uses it…just as everyone in France reuses jars and lids. At this point, I only use the boiling water bath if I’m making jam that I plan to give away miuch later (i.e. Xmas).
Very good! It is so nice to have general ratios to apply across fruit. Especially prefer weights to measures. Tried this with apricot today and it worked perfectly, although the lemon rind left a distinctive citrus peel flavor. Not bad, but not something I don’t always want in my jam. Do you think any pectin is imparted during the soaking part of the process? I’ve done a marmalade recipe that involves soaking the seeds to impart pectin, before cooking.
I know what you mean about the citrus peel. You can definitely leave out the lemon rind. I don’t think much, if any, pectin is imparted during soaking – pectin really needs a combination of heat and acid to be activated. But I could be wrong!
Thank you for the useful information I haven’t made jam in about 20years so I’m very excited to make some this summer.thanks again😊
How much water should be used? Could you provide a fruit lb to water (cup or ml) ratio?
I don’t use water. If the fruit is allowed to sit with the sugar, there should be enough liquid to start the cooking process.